
Recording & editing
Free podcast software: which should you choose?
Choose free podcast software and practise with an Audacity exercise: downloadable source audio, steps, checkpoints and an audio answer to compare.
Choose software according to your device and recording needs: Audacity, GarageBand and Waveform Free let you prepare an audio file, while publication needs a host. The comparison explains their differences, then the Audacity workshop lets you edit and export original synthetic audio before comparing it with the answer. You need neither your own podcast nor an account for this local exercise.
Which software should you choose to record a podcast?
The right choice depends on your device and how you record: a single voice, several tracks in the same room, or remote guests. These three programs let you prepare an audio file, but do not publish your show in place of a host.
The software comparison uses publishers’ documentation checked on September 25, 2026; it is not a ranking based on comparative tests. After the guidance on choosing software and local or remote recording, the Audacity workshop lets you practise. Its version, actions and verification status are stated alongside the files.
You can follow the workshop even if you have never recorded a podcast. Use the supplied source WAV, keep it unchanged and work on a copy. Saving and exporting locally in Audacity requires neither an audio.com account nor a cloud upload. The credits explain the source and reuse conditions for this synthetic audio.
| Software | When should you choose it? | Practical limitation |
|---|---|---|
| Audacity | Windows, macOS or Linux; record a voice, cut and export. | No official mobile version. |
| GarageBand for Mac | Mac; record and organise several audio tracks. | Mac application only; the iPhone/iPad version is separate. |
| Waveform Free | Compatible Windows, macOS or Linux system; work with several tracks. | Tracktion account required; some extensions are paid. |
Before editing: local or remote recording?
For a solo episode, the basic tasks are recording or importing a take, removing mistakes, adjusting the level and exporting. If you have remote guests, check separately how each voice is recorded and saved: local editing software does not, on its own, constitute a remote interview studio.
Exercise: edit your first audio in Audacity
Everything you need to practise, even if you do not have a podcast yet.
Turn a short practice recording into a clear episode: shorten three long silences, raise the level and export an audio file. You do not need a microphone, an account or your own podcast.
AI-generated audio · Audio credits
Before editing · the source audio
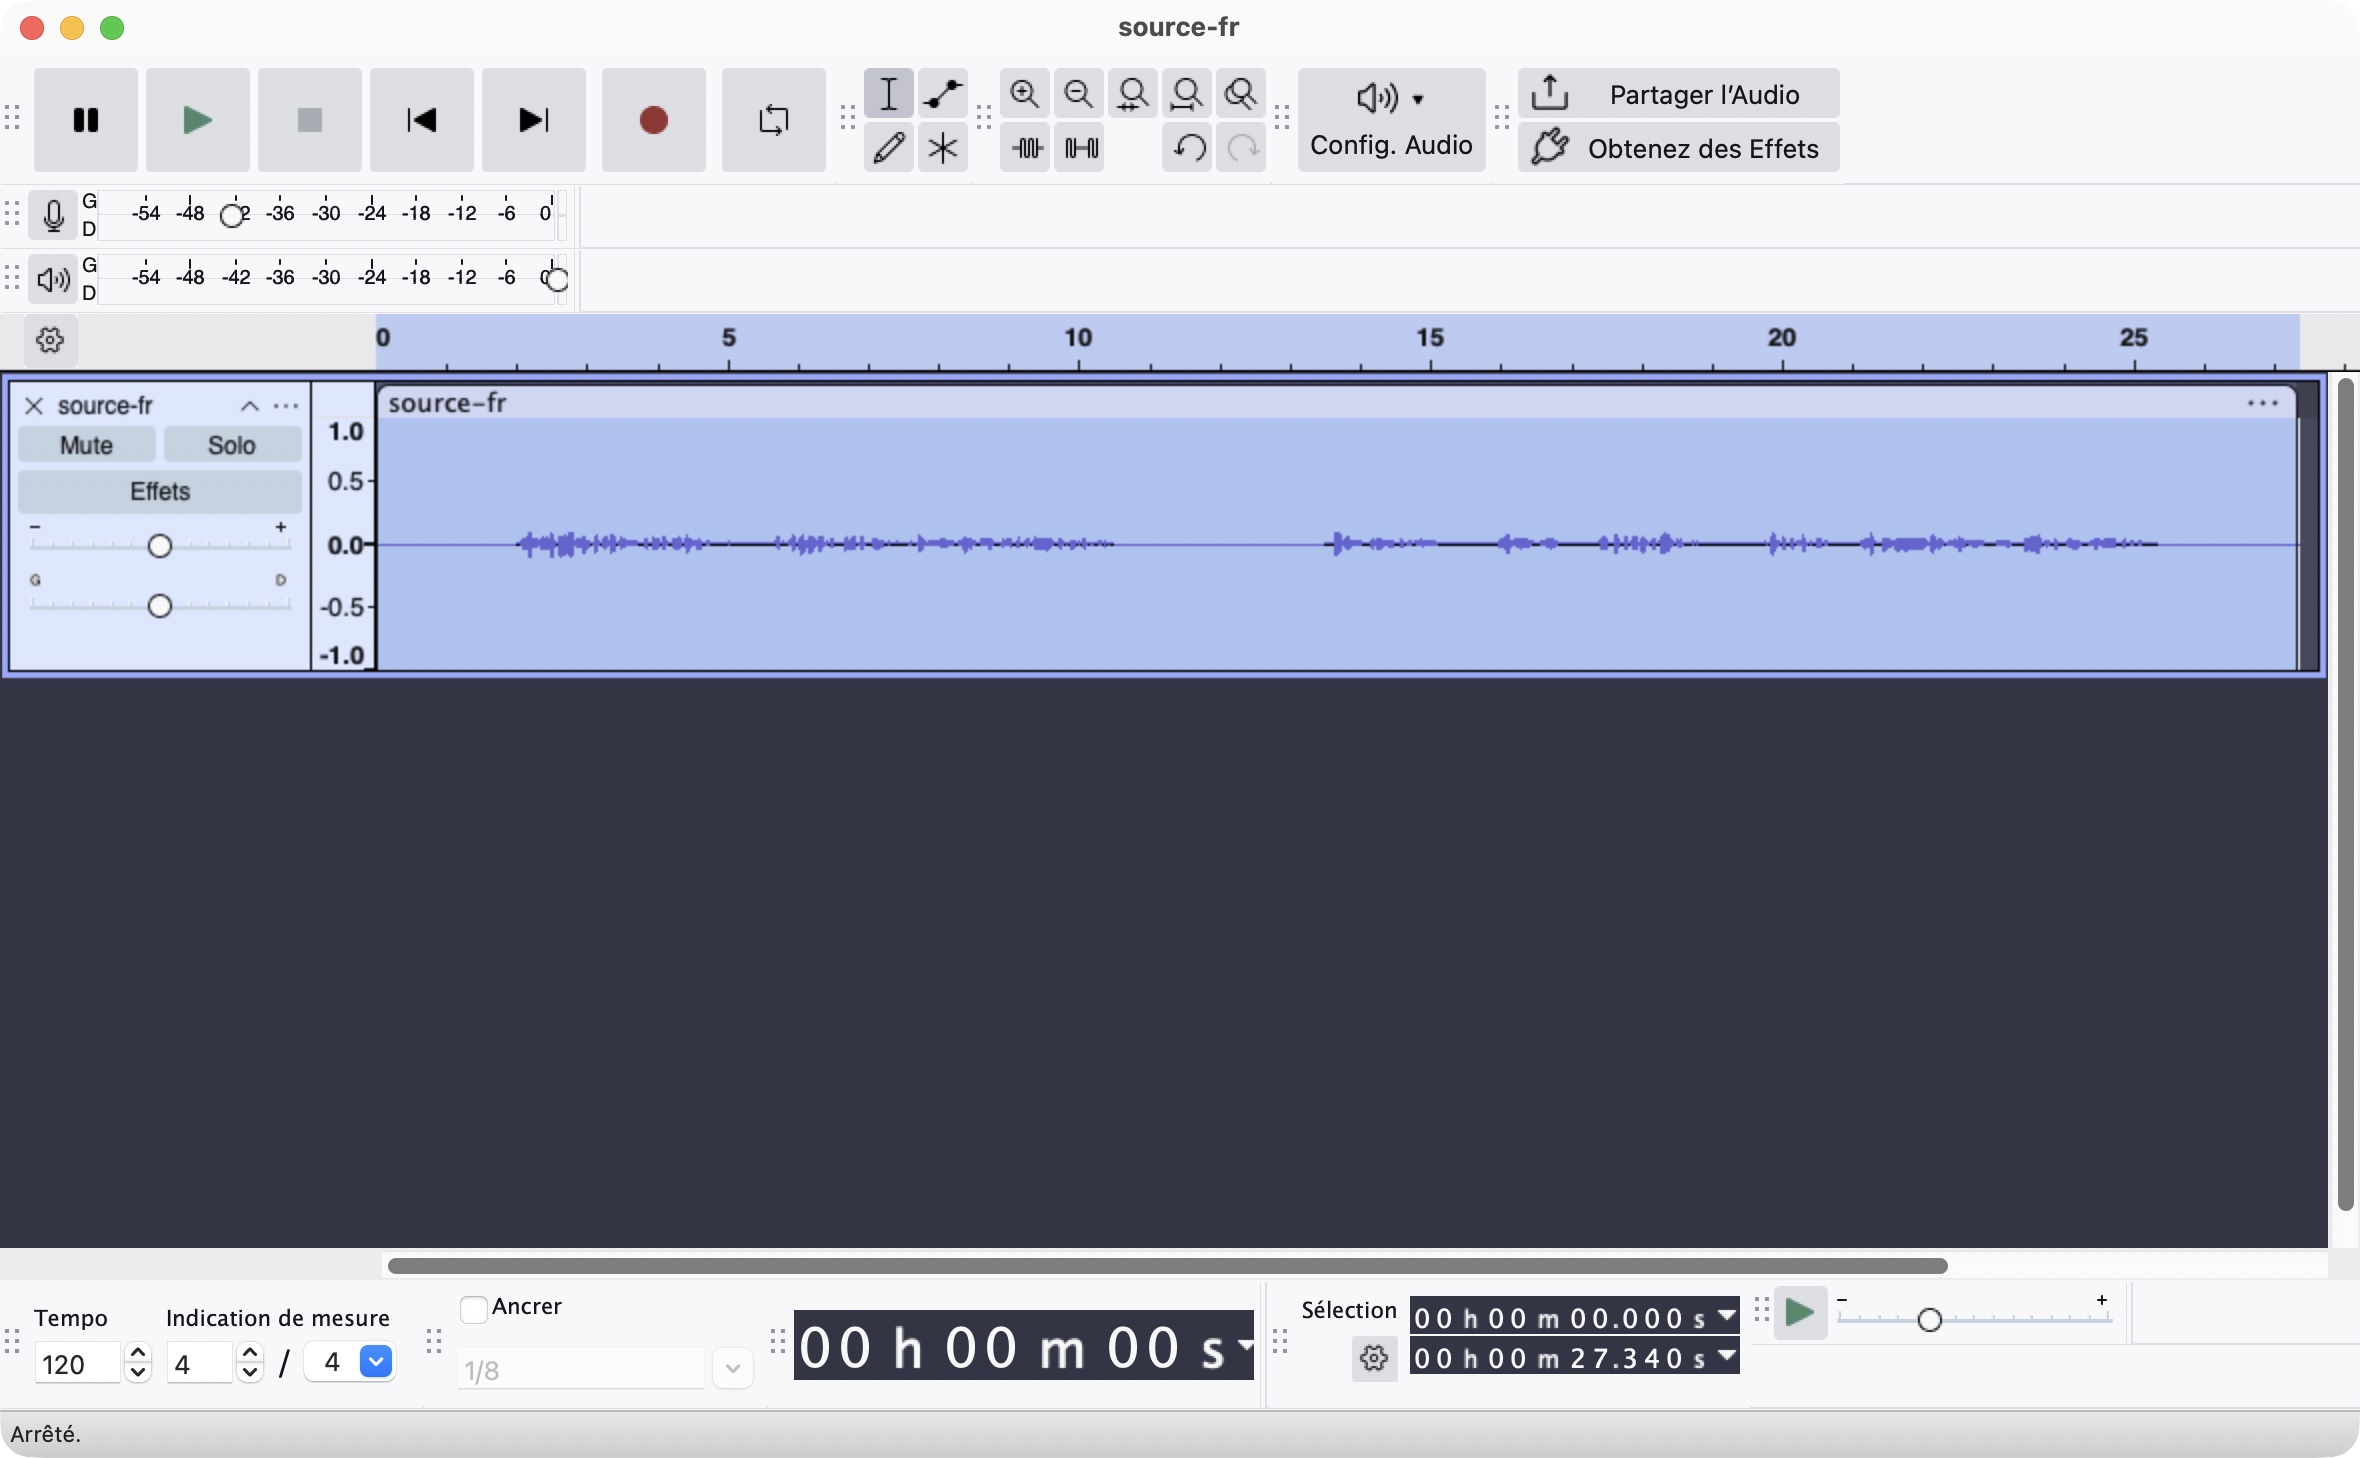
Listen first. This 24.780-second recording has a low peak level (-18 dBFS), 2 seconds of silence at the start, a 3-second pause in the middle and 2 seconds at the end.
Download the source WAVComplete the exercise in Audacity
Tested locally · Audacity 3.7.7 on macOS · 15 October 2026. The answer was edited with Audacity’s automated Select, Delete and Normalize commands. The middle cut in the French file was also tested with Backspace in the interface. WAV exports were checked in the interface. The manual steps below let you repeat the exercise.
Import and save a working project
Open Audacity, then import the downloaded source WAV with File → Import → Audio. Use File → Save Project → Save Project to save a working .aup3 file on your computer, under a new name.
CheckpointYou can see one audio track and hear the synthetic voice when you press Play.
Shorten the three long silences
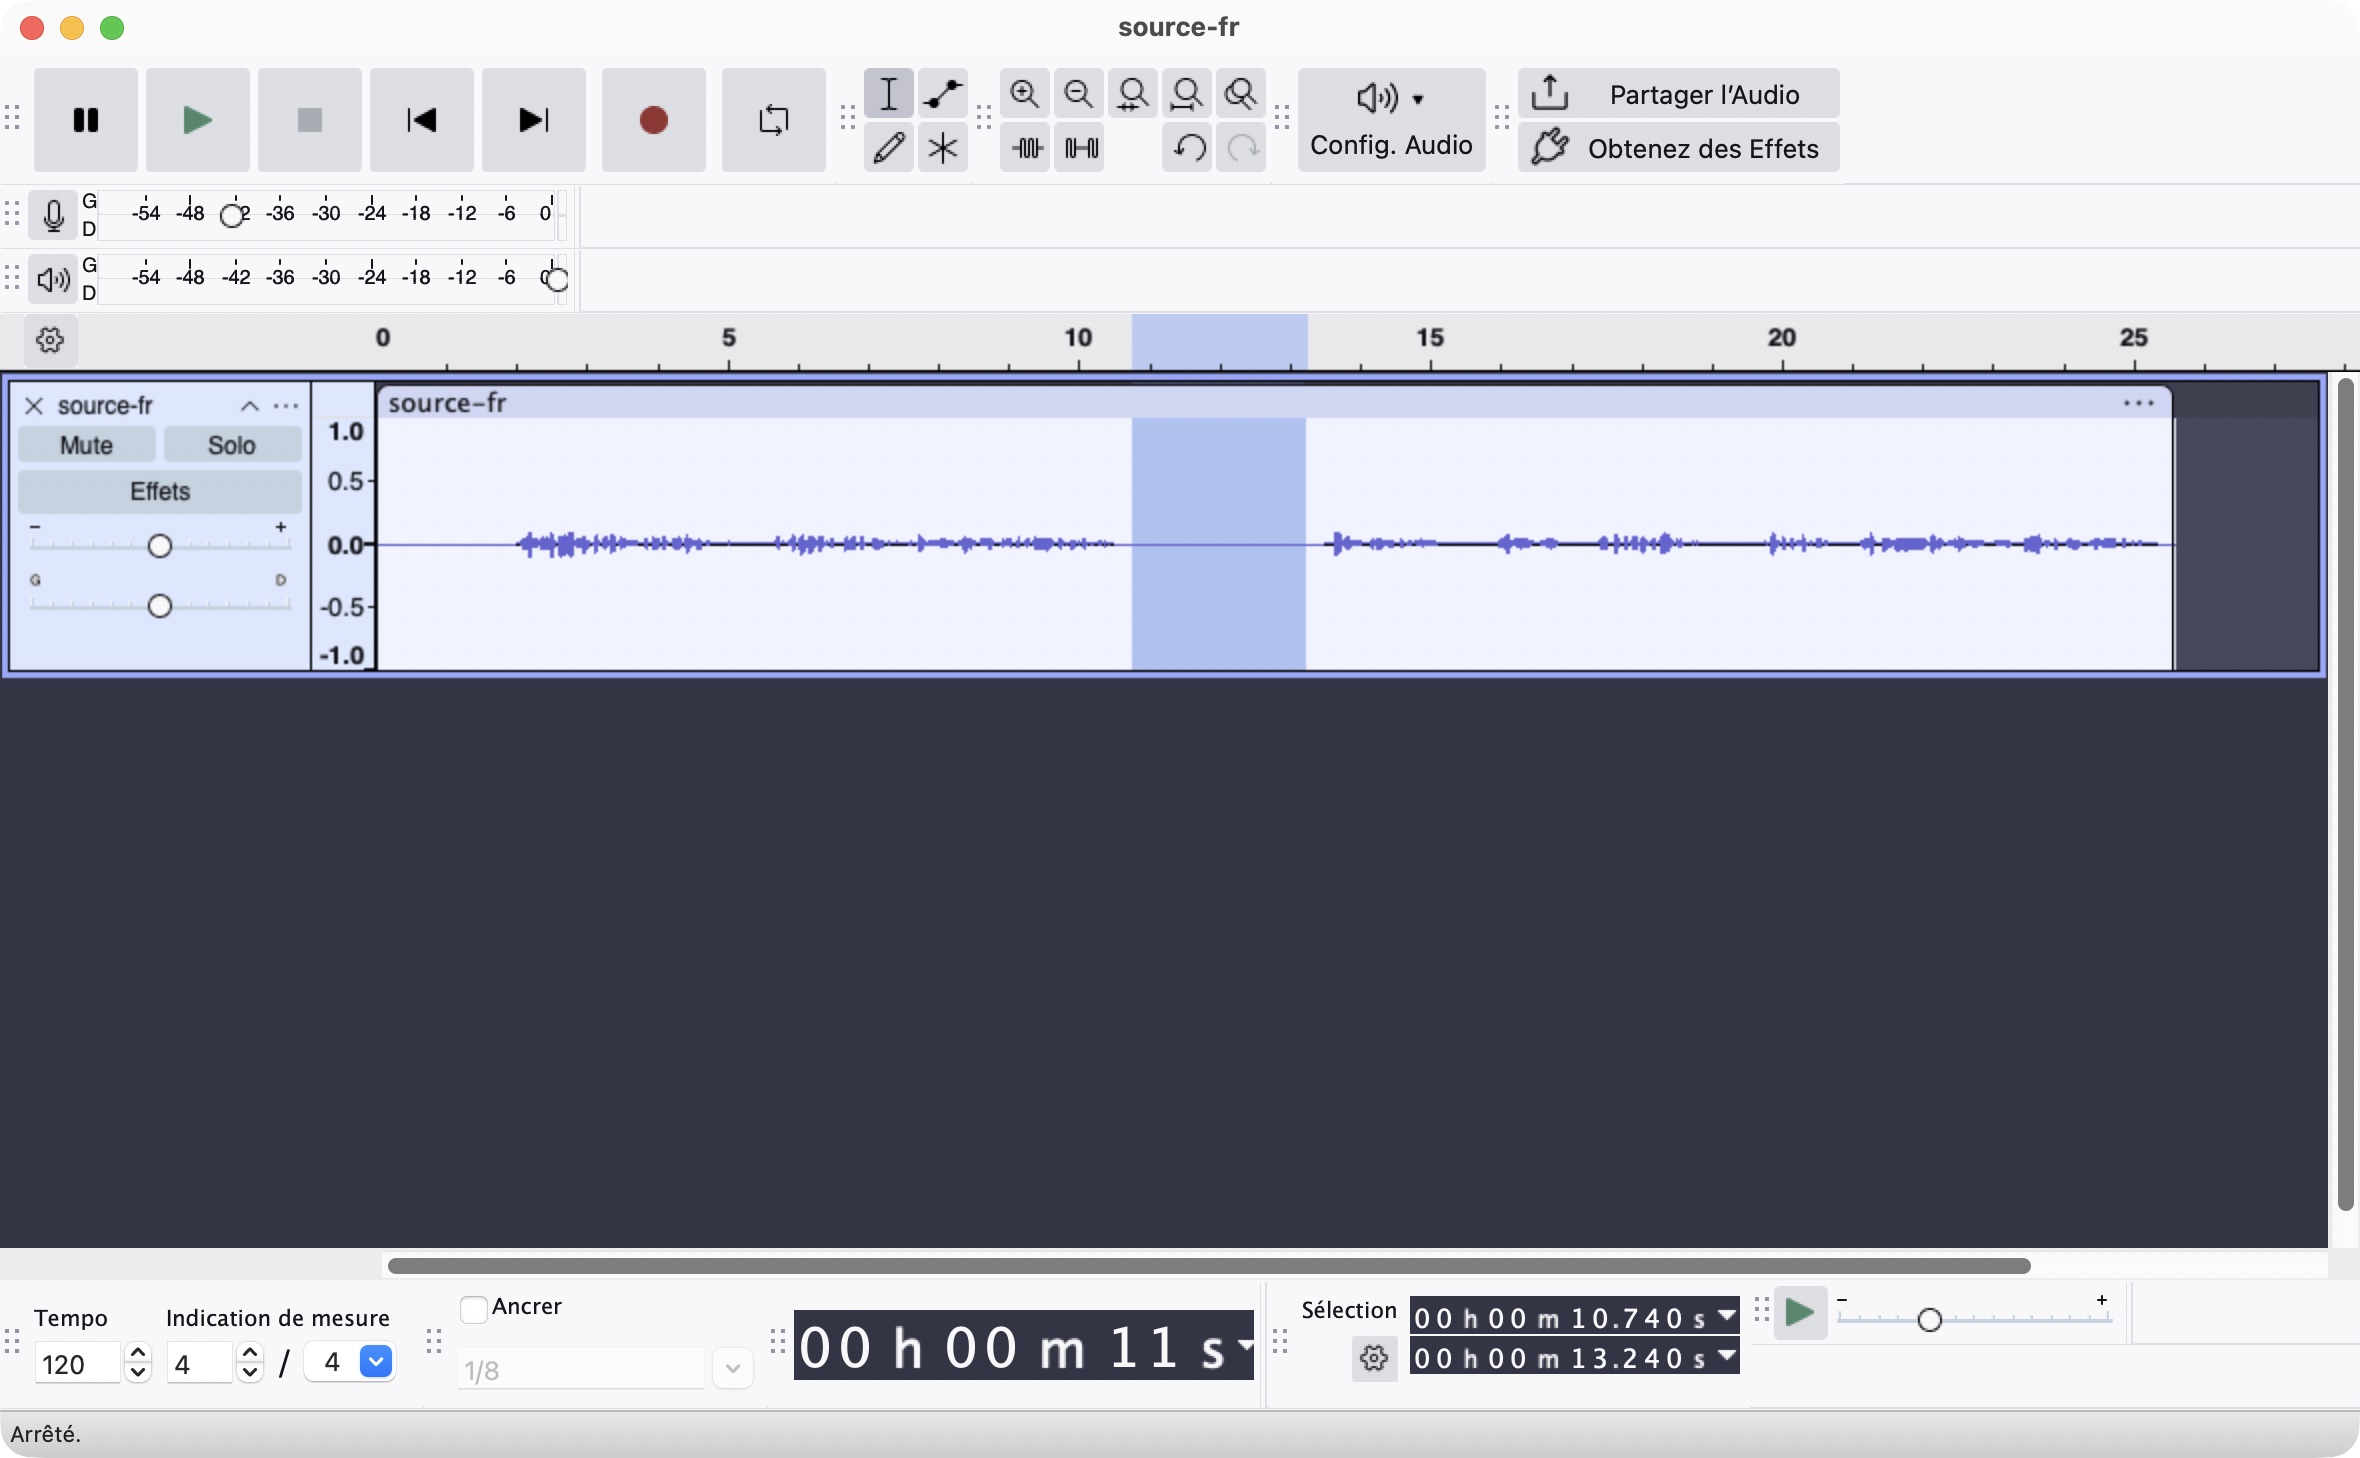
Delete the selections below in this order: end, middle, then start. Working backwards keeps the original time markers valid. In the Selection toolbar at the bottom, choose start and end fields in hours:minutes:seconds + milliseconds format. For example, 10.220 seconds is 00:00:10.220. Enter each pair, then use Edit → Delete or Backspace on Mac. Check that the gap closes. Keep the natural short pauses within each sentence.
Selections to delete · original timeline, in seconds Order / region Start End 1. End 23.030 24.780 2. Middle 10.220 12.720 3. Start 0.000 1.750 CheckpointThe first and final words are complete. Play across the middle join: no word is cut short. The edited track lasts about 18.780 seconds, 6 seconds shorter than the source.
Raise the level without clipping
Select all of the remaining audio with Cmd+A on Mac. Open Effect → Volume and Compression → Normalize. Enable Remove DC offset and set the maximum amplitude to −1 dB, then apply. This exercise sets the peak level; it is not a universal podcast loudness target.
CheckpointThe voice is louder and remains clear. A larger waveform alone is not proof that the result sounds better: listen again.
Export and listen to the file
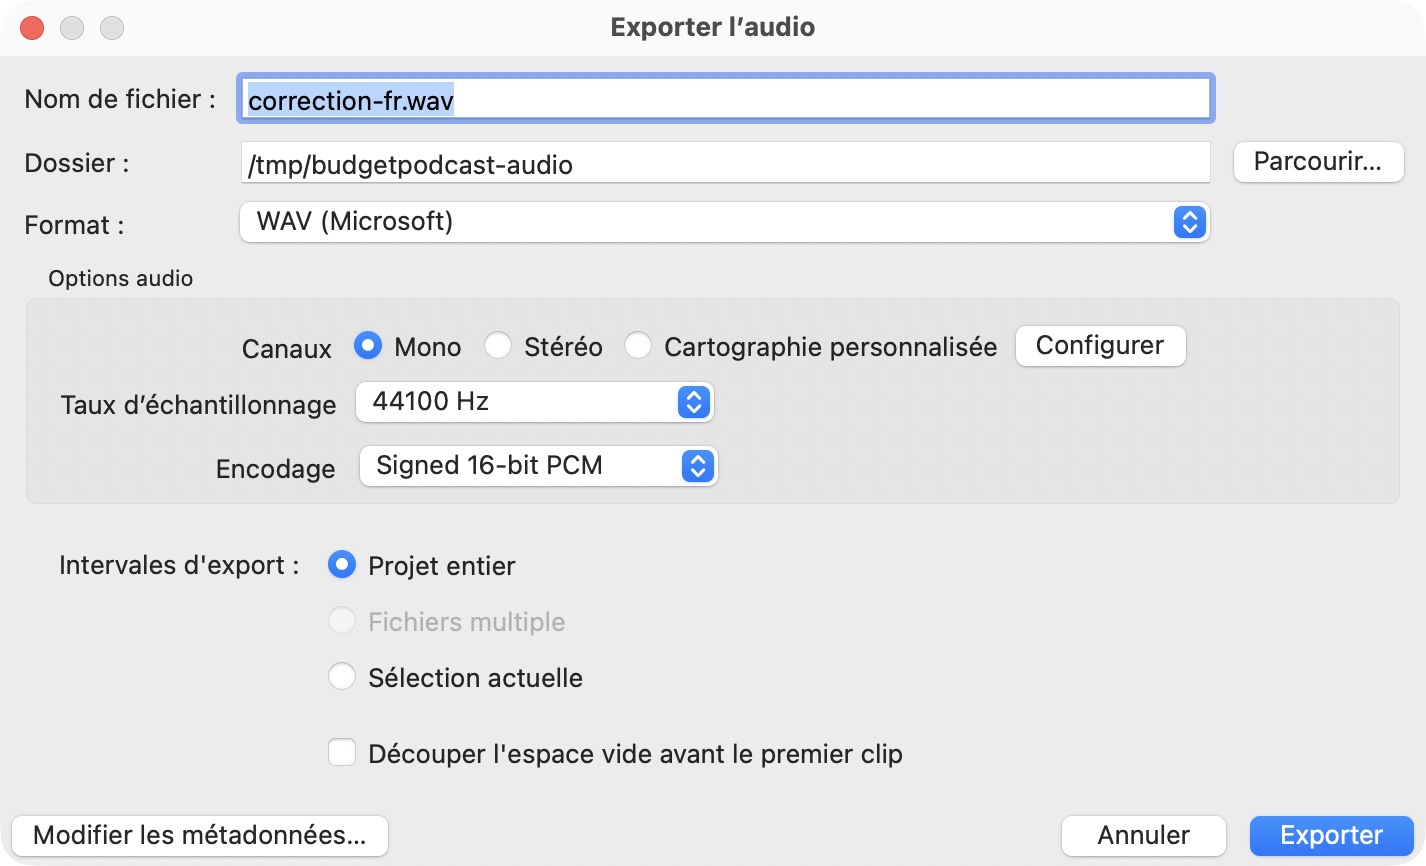
Choose File → Export Audio, then export to your computer. Select WAV (Microsoft), mono, 44,100 Hz and signed 16-bit PCM. Name it my-first-edit.wav. This is the uncompressed reference shown in the screenshots. Open the exported file and listen from start to finish. The listening answer is also provided as a mono MP3 with variable bit rate (VBR); its effective bit rate depends on the signal.
CheckpointYour WAV plays outside Audacity, starts promptly and contains both spoken parts. The saved Audacity project is your editable working file. You can later make an MP3 through the same export menu.
Official Audacity 3 instructions: editing audio (new tab) · saving and exporting (new tab)
3. Open the answer and compare your export
Compare the same sentence at a comfortable listening level. The answer shortens only the three long silences and raises the peak level. The synthetic voice is intentionally kept: this exercise teaches editing, not how to repair a real microphone recording.
After editing · the answer
Mono MP3 with variable bit rate (VBR), also used in the still-image video demonstration. The WAV below is the uncompressed 44.1 kHz / 16-bit reference. The RSS lesson is a separate example.
Download the answer (MP3)- All the words are still present, in the same order.
- The three long silences are shorter; natural speech pauses remain.
- The export opens and plays correctly. Small MP3 encoding differences do not change whether you completed the exercise.
1. Import or record a clean take
For the workshop above, download the source WAV and import a copy into Audacity. This practice recording contains the silences to shorten; it is separate from the narration about RSS in the publishing guide. No microphone or personal recording is needed. For your own episode later, download the software from its official source, select the correct input device and make a short test recording.
Before a long session, check that the imported file is complete, that all voices are audible and that the recording comes from the intended microphone. The exact menus depend on the version you use: refer to the manual that matches your installation.
2. Make a first edit without excessive processing
Start with useful cuts: unnecessary material at the beginning and end, restarted sentences, very long silences and mishaps. Move passages if it makes the story clearer. Listen back to each edit; a cut that is too tight can make speech sound less natural.
The aim is clear, consistent listening. Processing cannot always repair a clipped voice or strong reverberation. Improving the room and microphone placement before recording is often a better first step than adding more effects.
3. Distinguish saving the project from exporting audio
Saving the project locally preserves an editable version of your work. Exporting creates a playable audio file: reopen it to check the beginning, edits, ending and duration, then compare your result with the workshop answer. Do both: keeping only a final MP3 makes revisions less flexible; keeping only the project is not enough to publish.
- A folder for the original recording.
- An editing project identified by episode.
- An exported final file that you have listened back to.
- A backup copy independent of your main computer.
4. Manage the file format and the iPhone case
Choose a final format accepted by your host. Voice Memos normally exports an M4A file. On Windows and Linux, importing it into Audacity may require the FFmpeg library; on Mac, unprotected M4A files can generally be imported without it. To export M4A from Audacity, consult the official FFmpeg instructions rather than downloading an unknown converter.
MP3 export on Windows and macOS already includes LAME: older tutorials that ask you to install it separately do not apply to current versions. After conversion or export, listen to the final file and check its duration before uploading.
After editing: plan for publication
Your choice of software does not determine your hosting subscription. You can prepare the audio with a free tool, then choose a free or paid plan based on your archives, production volume and needs. Keep your files so you can change providers later.
Official sources
Guide updated on 16 October 2026. Check the sources below: plans and interfaces may change.
- Audacity: free software and supported operating systems, new tab
- Audacity: preparing your first recording, new tab
- Apple: GarageBand for Mac, a free application, new tab
- Apple: recording and editing with GarageBand for Mac, new tab
- Tracktion: Waveform Free features and supported operating systems, new tab
- Tracktion: account required for installation, new tab
- Audacity: basic audio editing, new tab
- Audacity: saving and exporting, new tab
- Audacity: installing FFmpeg, new tab
- Audacity: importing M4A on Mac, Windows and Linux, new tab